QuickBooks error 1334 is one of the errors that occur from time to time while using the software. QuickBooks application is one of the most popular software among different businesses. It is user-friendly accounting software that helps the user to track their transaction and keep the records safe. However, besides its amazing features, users also face many issues. If you are also dealing with QuickBooks error 1334 repair, then this is the right page for you.
In this article, we will discuss the QuickBooks repair error 1334 in detail, along with the symptoms, causes and the solution. This article may freeze the computer or it could also lag your system. So read the whole article till the end and do not skip any section.
What is QuickBooks Error 1334?
QuickBooks Error 1334 repair generally occurs due to the damaged or missing QuickBooks. This can also lead to many QuickBooks-related errors such as quickbooks update error 15243. It may also arise due to the corrupted company file .NET. The error message comes while updating, installing, or repairing QuickBooks. The user who faces the error may receive the following error message:
“Error 1334. Error writing to file [file name]. Verify that you have access to that directory”
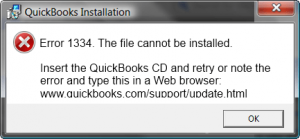
“Error 1334. The file cannot be installed. Insert the QuickBooks CD and try”
Symptoms of QuickBooks Error 1334
Before directly jumping into the solution of the error, let’s first discuss the symptoms of the error 1334 QuickBooks. Following are the symptoms that the users generally faced.
- This error results in the lagging or sluggish response of the input of the keyboard or mouse.
- The error message of QuickBooks error 1334 occurs on the display, which crashes the active program.
- It freezes the system for a few seconds.
- The QuickBooks software loads but the user could not use it.
Trigger of QuickBooks Error 1334
There could be more than one reason that might be causing the error to arise in your system. Now since we know the symptoms of error 1334 quickbooks, it’s time to learn the causes that might be triggering the error and give you a hard time using the software. Hence we have created a list of triggers, check them below:
- There could be some kind of damage to the Windows registry that might have to arise from some recent changes in QuickBooks.
- It is possible that you have downloaded an incomplete version of QuickBooks, or have got a corrupted file.
- Malware or virus could have damaged the QuickBooks or other related files.
- Third-party software like antivirus may have deleted some important files that are related to QuickBooks.
How to Resolve QuickBooks Error 1334?
In the above sections, we have learned various triggers of the error 1334 QuickBooks and general symptoms customers face while using the software. Now we will learn various methods to solve the problem from your system. And since we are well aware of the causes and triggers that might have arisen the error, it will be easy to resolve it more effectively. So without further ado, let’s discuss them all step by step. We highly recommend you to follow each and every process very carefully.
Solution 1: Verify QuickBooks Company File Extension | QuickBooks Error 1334
It is the first step of the solution, which involves verification of the Company file extension and renaming it to solve the error.
- First, open the Windows file.
- Then go to the Users options and click on the Public button.
- After that hit the Documents option.
- The above step will lead you to the file Intuit, click it.
- And then open the QuickBooks software from the drop-down list.
- If you have a different extension then click right on the option and tap the Rename button.
- Delete the incorrect extension and enter (.qbw) at the end of the file name.
Solution 2: Use QB Clean Install Tool | QuickBooks Error 1334
There are three main steps to clean install the QuickBooks software using the QB clean install tool.
- Uninstall the damaged QuickBooks software.
- After that Rename the Installation folders.
- Lastly, Reinstall QuickBooks.
Now in the steps below, we will discuss each of the steps in detail.
Uninstall QuickBooks

- Press the key Windows + R keys together on your keyboard to open the Run command.
- Then in the command box of the Run, enter the Control Panel and hit Enter.
- Choose the option Programs and Features and then tap on Uninstall a Program.
- Locate and double click on the QuickBooks.
- Choose the option Uninstall/ Change and then hit on the Uninstall button.
Rename QuickBooks Installation File
- Press the keys Windows + E together on your keyboard.
- Then navigate the path as follows:
C:\ ProgramData\ Intuit\ QuickBooks
64-bit version C:\Program Files (x86)\Intuit\QuickBooks
C:\Users\(current user)\AppData\Local\Intuit\QuickBooks
C:\Program Files\Intuit\QuickBooks
- On the folder of QuickBooks right-click and go to the option Rename.
- Then type OLD after the name of the file and reinstall the QuickBooks.
Download the QuickBooks Clean Install Tool
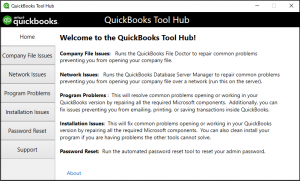
- Download QuickBooks Tools Hub.
- Save the folder.
- Try to open the tool QuickBooks Tool Hub from the list of download folders.
- Then to complete the installation procedure, follow the on-screen instruction.
- Select the option “I accept”.
- Hit on the QuickBooks Tools Hub.
- Select the QuickBooks version and then hit the Continue option.
- Click the OK button for the message “Please install your copy of QuickBooks to the default location.”
- Clean Install Tool deletes QuickBooks from the system and you can then continue to install it for fresh.
Solution 3: Repair Windows Registry and Scan | QuickBooks Error 1334
To solve the issue using this method, you need to download and install two different versions of Windows for removing the registry errors and any other malware.
Solution 4: Install Microsoft .NET framework and RUn QuickBooks Install Diagnostic Tool | QuickBooks Error 1334
This method is very helpful to remove any installation errors. However, before performing the manual fixation of the issue, follow the steps below =.
Windows 10, 8.1, 8
- First of all, close all the programs.
- Open the Start menu on your Windows device.
- Enter “Control Panel” in the search bar and then open the Control Panel.
- Go to the option Programs and Features.
- Then choose to Uninstall a Program (we are not uninstalling anything).
- Search for the option .NET Framework on the list.
- After that, verify the checkbox of .NET Framework 4.5.
- To verify the check box, turn off the .NET Framework 4.5.
- Choose the option OK to save the changes.
- Restart the PC.
- After signing back into Windows, try to again follow the same steps to turn on .NET Framework 4.5.
Final Note!
The above are a few solutions that would help you to resolve the QuickBooks repair error 1334. However, if none of the methods helped you to solve the problem then consider contacting the customer service of QuickBooks. The support team is available for 24X7 to help their customers. Hopefully, this article was helpful and informative for you. Also, check out other blogs on the website to get different technical-related pieces of information.